Achieving a bubble-free screen protector application is crucial for maintaining your device's pristine look and functionality. You can ensure a smooth and seamless installation process with a few simple steps and some attention to detail.
Starting with a clean screen free of dust and debris sets the foundation for success. Carefully aligning the screen protector and gradually smoothing it onto the screen while pushing out any air bubbles will result in a flawless finish.
By following these steps diligently, you can enjoy a crystal-clear screen protection solution that safeguards your device and enhances its visual appeal.
Why is Bubble-Free Application Important?
The presence of bubbles on your screen protector can be frustrating and unsightly. Not only do they obstruct the view of your device, but they can also affect touch sensitivity and hinder the overall functionality of your screen. Additionally, bubbles may trap moisture or dirt over time, potentially damaging your device. Dust particles trapped under the screen protector can also cause scratches and other imperfections on your display.
Therefore, striving for a bubble-free application of your screen protector is essential to ensure the best user experience and protect your device in the long run. Moreover, a bubble-free screen protector will be virtually invisible, allowing you to fully enjoy the high-resolution display of your device without any distractions. Air bubbles can also be a sign of poor installation, which may compromise the durability and longevity of your screen protector.
Types of Screen Protectors
Before diving into the steps for achieving a bubble-free installation, it is important to understand the different screen protectors available in the market.
Plastic film:
These are thin and flexible protectors that adhere directly to the screen. They are often less expensive but may not provide as much protection against scratches and impact. A screen protector is perfectly suited for touch screens that use styluses.
Tempered glass:
As the name suggests, these protectors are made of tempered glass and are more durable than plastic film. They offer better protection against scratches and impact but can be more expensive. Glass screen protector installation can be slightly more challenging due to their rigidity. Screen protector properly made with tempered glass provides the best clarity and touch sensitivity.
Liquid screen protector:
This type of protector is applied by spraying a liquid solution onto the screen, which then hardens into a thin layer. They are often advertised as providing invisible protection and improved touch sensitivity. Screen protector size can be challenging with this type, as it may not adhere properly to curved screens or devices with uneven surfaces.
These different screen protectors may require slightly different installation techniques, so it is important to follow the instructions provided by the manufacturer.
Step-by-Step Guide How to Choose the Screen Protector That's Right for You
When choosing the right screen protector, there are a few factors to consider:
Device type and model:
Different devices may require different types of screen protectors, so make sure to choose one specifically designed for your device.
Material:
As mentioned earlier, different materials are used in screen protectors, each with pros and cons. Consider your budget and the level of protection you need when selecting a material. Because of their unique properties, some materials may also require different installation methods.
Brand and quality:
Choosing a reputable brand with good reviews is important to ensure you get a high-quality screen protector that will effectively protect your device. A phone's screen protector is something you do not want to skimp on, as it can ultimately save you from costly screen repairs.
Additional features:
Some screen protectors may offer additional features like anti-glare, privacy, or blue light filters. Consider if these features are important to you when making your decision. A few bubbles may be worth it if a screen protector offers added functionality that you value.
Ultimately, the best screen protector for you will depend on your personal preferences and needs. It may be helpful to read reviews and do some research before making a purchase.
How to Put a Screen Protector Without Bubbles
Now we tell you the main steps you should follow to successfully apply a screen protector without bubbles:
Steps for Putting on a Screen Protector Without Bubbles:
Follow these simple steps to achieve a bubble-free installation of your screen protector:
Step 1: Prepare Your Device and Work Area
Before beginning the installation, make sure you have a clean and dust-free work area. Wipe down your device's screen with a microfiber cloth to remove any dust or debris.
Step 2: Align the Screen Protector
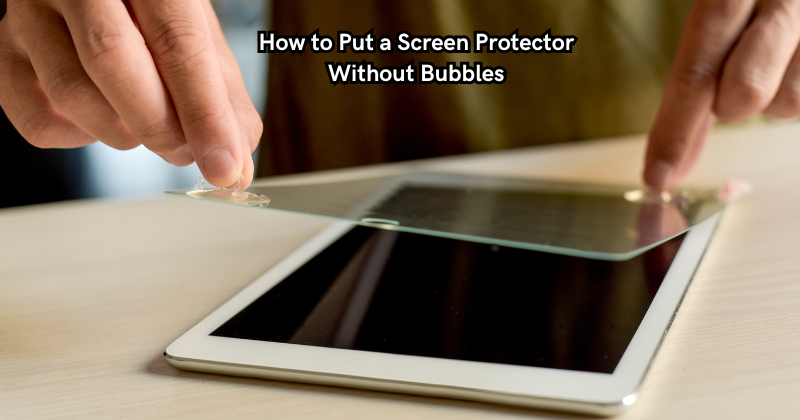
Carefully align the screen protector on your device's screen, making sure it is centered and correctly positioned. Most screen protectors come with an alignment tool that can help you achieve a perfect fit.
Step 3: Start Applying the Screen Protector
Peel off the backing of the screen protector and gently place it on your device's screen. As you lay it down, use a credit card or squeegee to gradually push out any air bubbles from the center outwards. Be gentle and avoid pushing too hard, as this can cause damage to the screen protector or your device's screen.
Step 4: Smooth Out Any Remaining Bubbles
If any bubbles remain, try using a credit card or squeegee to push them towards the edges of the screen. If they persist, you can carefully lift and reapply the screen protector until all bubbles are gone.
Step 5: Let it Settle
After successfully getting rid of all bubbles, let the screen protector settle for a few minutes. This will allow it to adhere properly to your device's screen and prevent any future bubbling.
These simple steps can help you achieve a bubble-free installation of your screen protector. Remember to be patient and take your time to ensure the best results.
Tips for Maintaining a Bubble-Free Screen Protector
Once you have successfully installed your screen protector without any bubbles, there are a few tips to keep in mind to maintain its bubble-free state:
Avoid Excessive Heat or Cold
Extreme temperatures can cause the adhesive on your screen protector to weaken and create air pockets. It is best to avoid leaving your device in direct sunlight or exposing it to extreme temperatures.
Use a Case
A sturdy case can provide added protection for your device and screen protector, reducing the chances of bubbles forming due to impacts or pressure on the screen.
Don't Remove and Reapply Too Often
Repeatedly removing and reapplying your screen protector can cause dust and debris to accumulate around the edges, leading to bubbles. Only remove and reapply if absolutely necessary.
Clean Your Screen Regularly
Dirt, oil, and dust can accumulate on your screen protector over time, causing bubbles to form. Make sure to regularly clean your device's screen with a microfiber cloth to prevent this from happening.
By following these tips, you can maintain a bubble-free screen protector for your device's lifespan. Remember to be gentle when handling your device and avoid any harsh chemicals or abrasive materials when cleaning the screen protector.
Benefits of Using a Screen Protector
Using a screen protector offers a myriad of benefits that can significantly enhance the longevity and usability of your device. Firstly, a screen protector acts as a shield against scratches, smudges, and minor impacts, preserving the pristine condition of your screen and ensuring a clear display at all times. Additionally, screen protectors can reduce glare and fingerprints, making it easier to view content even in bright light conditions.
Moreover, some screen protectors come with special coatings that provide additional features such as anti-bacterial properties or blue light filtering, promoting eye health during extended device usage. Investing in a quality screen protector is a wise decision to safeguard your device and improve your overall user experience.
FAQs
How can I ensure I apply my new screen protector perfectly without any annoying bubbles?
To apply a screen protector perfectly and avoid annoying bubbles, start by cleaning your phone's display thoroughly to remove any dust or smudges. Use a dust removal sticker to pick up any tiny particles. Then, carefully align the screen protector with your phone screen, starting from one end and gradually pressing down to the other. Use a plastic card to smooth out any bubbles as you go.
What's the correct way to prepare my phone screen before applying a screen protector?
Before applying a screen protector correctly, it's crucial to clean your phone's display thoroughly. Use a microfiber cloth to wipe away smudges and fingerprints. Then, use a dust removal sticker to lift off any remaining dust particles. A clean phone screen is essential to prevent more air bubbles from forming under the screen protector.
Why is it important to use a dust removal sticker when applying a screen protector?
Using a dust removal sticker is vital because even the smallest dust particle on your phone's display can cause a bubble to form under the screen protector. By using the sticker to remove all dust before applying the sticky side of the screen protector, you significantly reduce the risk of ending up with annoying bubbles.
How do I get rid of bubbles that have already formed under my screen protector?
If you've already applied your screen protector and notice some bubbles, don't worry. You can usually push them out to the edges using a plastic card. Gently press the bubble with the card and move it towards the nearest edge of the screen protector. For stubborn bubbles, you may need to slightly lift the screen protector's edge (be careful not to touch the sticky side) and reapply it while smoothing out the bubble with the card.
Conclusion
In conclusion, achieving a bubble-free application of a screen protector is not just about aesthetics; it's about ensuring optimal functionality and protection for your device. By adhering to the meticulous steps outlined earlier—starting with a clean screen, precise alignment, careful smoothing, and patience throughout the process—you can enjoy a flawless finish that enhances both the look and usability of your device.
The effort put into correctly applying a screen protector without bubbles pays off in the form of a crystal-clear display, free from distractions and imperfections. This attention to detail safeguards your screen from damage and improves your overall user experience by providing a seamless and unobstructed view of your device's content.
